Starlink Slow Speed: 7 Causes & Proven Fixes (2026 Troubleshooting Guide)
On this page
If your Starlink internet suddenly feels sluggish, the bottleneck is rarely an arbitrary constellation failure. In over 80% of real-world troubleshooting scenarios, degraded speeds stem from five isolated variables: local 2.4 GHz Wi-Fi interference, a physical Ethernet cable downgrading from Gigabit to 100 Mbps Fast Ethernet, fractional tree obstructions, peak-hour Fair Use deprioritization, or upstream bufferbloat during simultaneous uploads. Running the official Starlink Advanced Speed Test is the essential first step to isolate whether the slowdown is occurring inside your living room or across the satellite RF link.
This guide provides a systematic 7-step diagnostic checklist to identify the exact root cause of your speed drop and restore full download throughput. For broader connectivity and hardware issues, check our complete troubleshooting and diagnostic guides hub.
Step 1: Isolate Local Wi-Fi from Satellite Backhaul
Standard browser speed tests (such as Ookla Speedtest or Fast.com) only measure aggregate throughput between your individual device and a distant web server. If your laptop has poor Wi-Fi reception, the test will report low speeds even if your Starlink dish is receiving 220 Mbps from orbit.
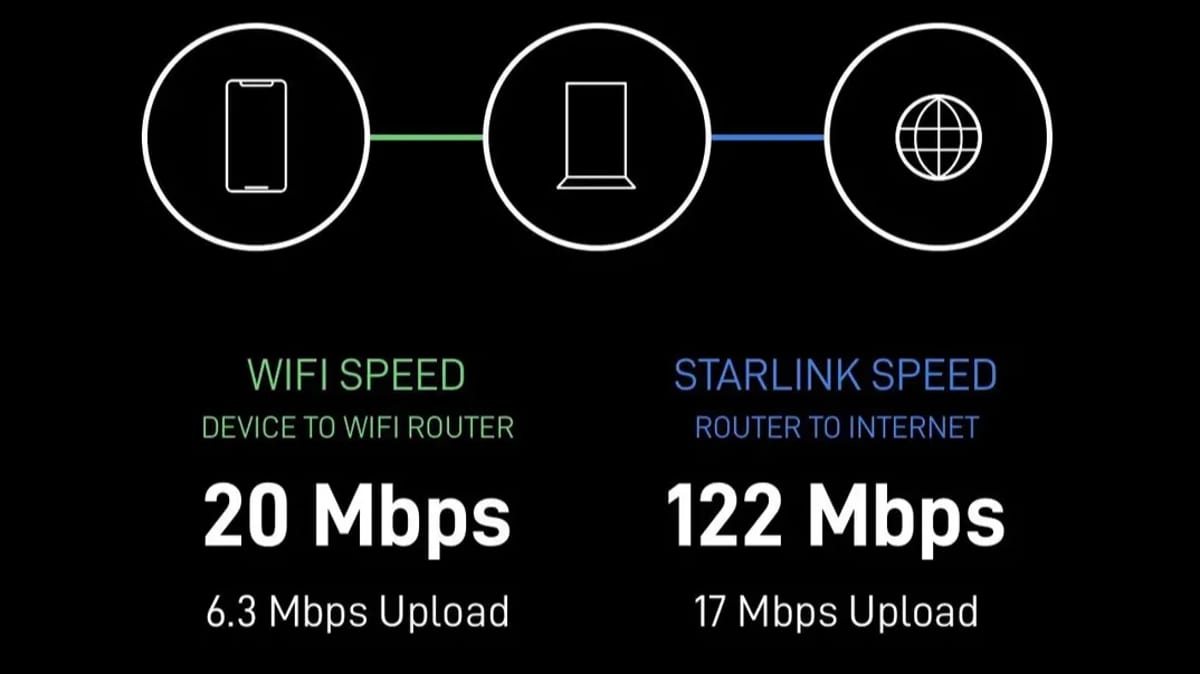
Open the Starlink Mobile App and select Speed Test > Advanced. The app runs two independent diagnostic tests simultaneously:
1. Device to Router Speed: Measures the local Wi-Fi link between your phone and the Starlink gateway. If this speed is below 50 Mbps, the issue is local wireless interference, wall attenuation, or 2.4 GHz band crowding.
2. Router to Internet Speed: Measures the direct radio link between your dish and the Starlink satellite constellation. If this test shows 150+ Mbps while Device to Router shows 25 Mbps, your satellite connection is perfectly healthy, and the bottleneck is purely local Wi-Fi.
Step 2: Check for 100 Mbps Ethernet Negotiation Degradation
If you connect third-party routers, PCs, or network switches via Ethernet, a subtle physical fault can silently cap your download speed at exactly 90 to 94 Mbps. Gigabit Ethernet requires all 8 pins (4 twisted pairs) in a Cat5e/Cat6 cable to establish a 1000 Mbps Full Duplex link. If even a single pin suffers oxidation, corrosion, or bend strain, the network interface automatically negotiates down to 100 Mbps Fast Ethernet.
To verify your link speed, open the Starlink App, navigate to Settings > Advanced > Debug Data, and locate the 'Ethernet' section. If the port displays '100 Mbps' instead of '1000 Mbps', inspect your cable connectors for dirt, debris, or pin misalignment. On Gen 2 actuated dishes, reseat the proprietary SPX connector into the Ethernet Adapter. For repairing damaged exterior wiring, consult our Starlink cable repair and pinout replacement guide.
Step 3: Inspect the 3D Obstruction Heatmap
Because Starlink satellites traverse the sky at approximately 27,000 km/h, your phased-array antenna hands off connections to a new satellite every 3 to 5 minutes. As detailed in the official Starlink Obstruction documentation, even fractional tree branches or chimney edges covering less than 1% of your dish's 100-degree field of view cause intermittent micro-outages.
When a satellite passes behind an obstruction, your dish suffers momentary packet loss, forcing TCP connections to reset their congestion windows and collapsing download speeds. In the Starlink App, open the Obstructions tab and inspect the red highlights on the 3D dome. If red obstruction clusters appear, elevate your mounting pole or relocate the antenna. Review our Starlink obstruction heatmap and placement guide for zero-obstruction clearance tips.
Step 4: Understand Peak-Hour Congestion & Fair Use Deprioritization
If your download speeds consistently drop between 5:00 PM and 11:00 PM local time but rebound to 180+ Mbps late at night, your local cell is experiencing peak network congestion. Under the Starlink Fair Use Policy and Service Specifications, bandwidth is dynamically allocated across service tiers during high-demand hours.
Standard Residential subscribers receive priority queue scheduling (expected 50 to 220 Mbps download). Conversely, Mobile (Roam) and deprioritized regional plans drop to 5 to 50 Mbps during peak congestion windows. If you rely on a Mobile/Roam plan for a fixed home location in a crowded cell, upgrading to a Standard Residential service tier restores priority bandwidth.
Starlink Speed Troubleshooting Matrix
Use this comprehensive diagnostic matrix to correlate symptoms with root causes and actionable remedies:
| Observed Symptom | Root Cause | Diagnostic Test | Recommended Solution |
|---|---|---|---|
| Speeds capped at 90-94 Mbps | Ethernet link negotiated at 100 Mbps Fast Ethernet | App Settings > Advanced > Debug Data (Ethernet Port) | Clean RJ45/SPX pins, replace damaged Cat6 patch cable |
| Router shows 200 Mbps, phone gets 25 Mbps | Device locked to crowded 2.4 GHz Wi-Fi channel | Starlink App Advanced Speed Test (Device to Router) | Split 2.4 / 5 GHz SSIDs and lock devices to 5 GHz |
| Speed drops every 3-5 minutes | Fractional obstructions interrupting satellite handoffs | App Obstructions tab (3D red obstruction map) | Elevate mount pole above roofline or prune foliage |
| Speeds drop only between 5 PM and 11 PM | Cellular congestion & Roam/Mobile deprioritization | Hourly speed logging during off-peak vs peak hours | Upgrade to Standard Residential plan for priority queue |
| Speed tanks during heavy rain or snow | Ku-band rain fade & Adaptive Modulation (ACM) | Weather radar correlation & Snow Melt status | Set Snow Melt to 'Automatic'; wait out intense rain cells |
Step 5: Account for Rain Fade and Snow Accumulation
Starlink user terminals transmit in the 14.0-14.5 GHz Ku-band and receive in the 10.7-12.75 GHz band. In heavy convective downpours (>25-50 mm/hr), raindrops absorb and scatter RF signals (rain fade). Rather than dropping the connection entirely, Starlink's Adaptive Coding and Modulation (ACM) algorithm automatically throttles modulation schemes from 64-QAM down to QPSK, maintaining link stability at lower throughput until the storm cell passes.
During winter storms, heavy wet snow accumulation on the antenna face attenuates signal reception. Verify that Settings > Starlink > Snow Melt is set to 'Automatic' or 'Pre-Heat' so the dish draws additional heating power to shed snow buildup.
Step 6: Eliminate Upload Bufferbloat with Smart Queue Management
Starlink connections are asymmetrical, typically providing 150 to 220 Mbps downlink and 15 to 25 Mbps uplink. When cloud storage backups, video uploads, or security cameras saturate the 20 Mbps uplink, unmanaged packet buffers inflate in the router, causing ping latency to spike from 35ms to 250ms+ and stalling downstream web requests.
Because stock Starlink routers lack advanced active queue management, enabling Bypass Mode and deploying a third-party router (e.g., pfSense, UniFi, or ASUSWRT) equipped with Smart Queue Management (SQM using CAKE or FQ-CoDel per IETF RFC 8290) bounds latency and prevents upload saturation from choking download speeds.
Step 7: Perform a Clean Constellation Soft Reboot
If your connection remains unusually slow despite zero obstructions and off-peak hours, the dish may be locked into an orbital plane with high satellite contention. Triggering a soft reboot via Starlink App > Settings > Starlink > Reboot Starlink clears routing buffers, resets local DHCP leases, and forces the phased array to acquire a fresh, optimal satellite orbital track.
Frequently Asked Questions
What is considered a normal Starlink download speed?
For Standard Residential plans, normal download speeds range between 50 and 220 Mbps, with upload speeds between 10 and 25 Mbps and ping latency between 25 and 50 ms. During off-peak hours (early morning), speeds frequently reach 200 to 250+ Mbps.
Why does my Starlink speed drop below 10 Mbps at night?
Evening slowdowns between 5 PM and 11 PM are typically caused by cell congestion. If you are on a Mobile (Roam) plan, your data is deprioritized behind Standard Residential users during peak hours. Upgrading to a Standard plan restores priority data access.
Can a bad cable really cause slow Starlink speeds?
Yes. If an Ethernet cable or SPX adapter has bent pins, moisture, or dirt, the network interface downgrades from Gigabit (1000 Mbps) to Fast Ethernet (100 Mbps), hard-capping your speed at ~90-94 Mbps. Check App > Settings > Advanced > Debug Data to verify your port speed.
Does using a third-party mesh router improve Starlink speeds?
A third-party mesh router does not increase the raw speed from orbit, but it significantly improves local Wi-Fi coverage across large homes, eliminating 2.4 GHz dead zones and SQM bufferbloat. Always enable Bypass Mode on the Starlink router to avoid double-NAT issues.